

For the last couple years, I headed up the STEAMlab here in Bozeman. It's an awesome space located in the basement of the Children's Museum of Bozeman. A little over two years ago, the room was renovated, and outfitted with laptops, 3D printers, Arduino and Raspberry Pi kits, a 70" TV and more. During my time there, I developed curriculum and ran classes for kids ages 8 and up (yes, that includes adults, but most of the activities are for 4th-6th graders) around 3D printing, coding, electronics and other technology topics. The A in STEAM stands for arts. The museum (and I) feel very strongly that it's important to incorporate the arts into STEM topics, so the classes I developed always tried to incorporate a creative component or a traditional art form such as music.
One of the last classes I taught there was called Magical Musical Objects, and I taught the kids how to program microcontrollers to play musical notes over MIDI whenever they touched potatoes. This activity is very similar to the banana piano demo for the Makey Makey. The big difference is we used a board that I designed called MUSE (Music Using Simple Electronics). Just like the Makey Makey, MUSE can quickly be hooked up to conductive things such as fruit and potatoes and trigger events when touched while holding a ground wire. The difference is the MUSE board is meant to be programmed by beginners. The Makey Makey can be programmed, but it ships with preuploaded firmware that simulates mouse clicks and keyboard keystrokes. I developed a simple Arduino library that makes it easy to program the MUSE board to play MIDI notes when fruit or other conductive materials that are wired up to it are touched. The kids programmed their microcontrollers to play individual notes and chords as well as to play full songs that we transcribed from sheet music, something that isn't all that straight forward for a beginner on the Makey Makey.
After running the class, I decided to put together a little demo for the museum that could be used to show parents what their kids would be doing in a future class. For a while it sat in the STEAMlab, as a make-shift setup, but the museum recently had to renovate their whole building due to a flooding incident and reopened with a snazzy new exhibit space. To replace one of the damaged exhibits, they upgraded my demo to a full blown exhibit. It's now located downstairs and is called the Toolbox Piano. Here's my son and I playing around with it at the Children's Museum's Open House:
And here is my wife playing Twinkle Twinkle Little Star:
Learn how to make your own below!
The Build
What you'll need
- MUSE kit - Out of stock currently, but you can source your own
- MUSE PCB - You can order them in multiples of 3 from Osh Park. You can source them elsewhere with the Eagle files here.
- 22Mohm resistors - This is a pack of 50. You'll only need 16 of them.
- 220 ohm resistors - This is a pack of 50. You'll only need 2 of them.
- SDS-50J MIDI connector - This is the only one I could find on Amazon, and it shows the wrong picture, but seems to be the right part number. This is the link to the right part on DigiKey (if you go that route, you'll probably want to get the 22M and 220 resistors from DigiKey as well).
- M3 machine screws - You'll need 18 to put one in every hole in the PCB.
- M3 hex nuts - Again, you'll need 18.
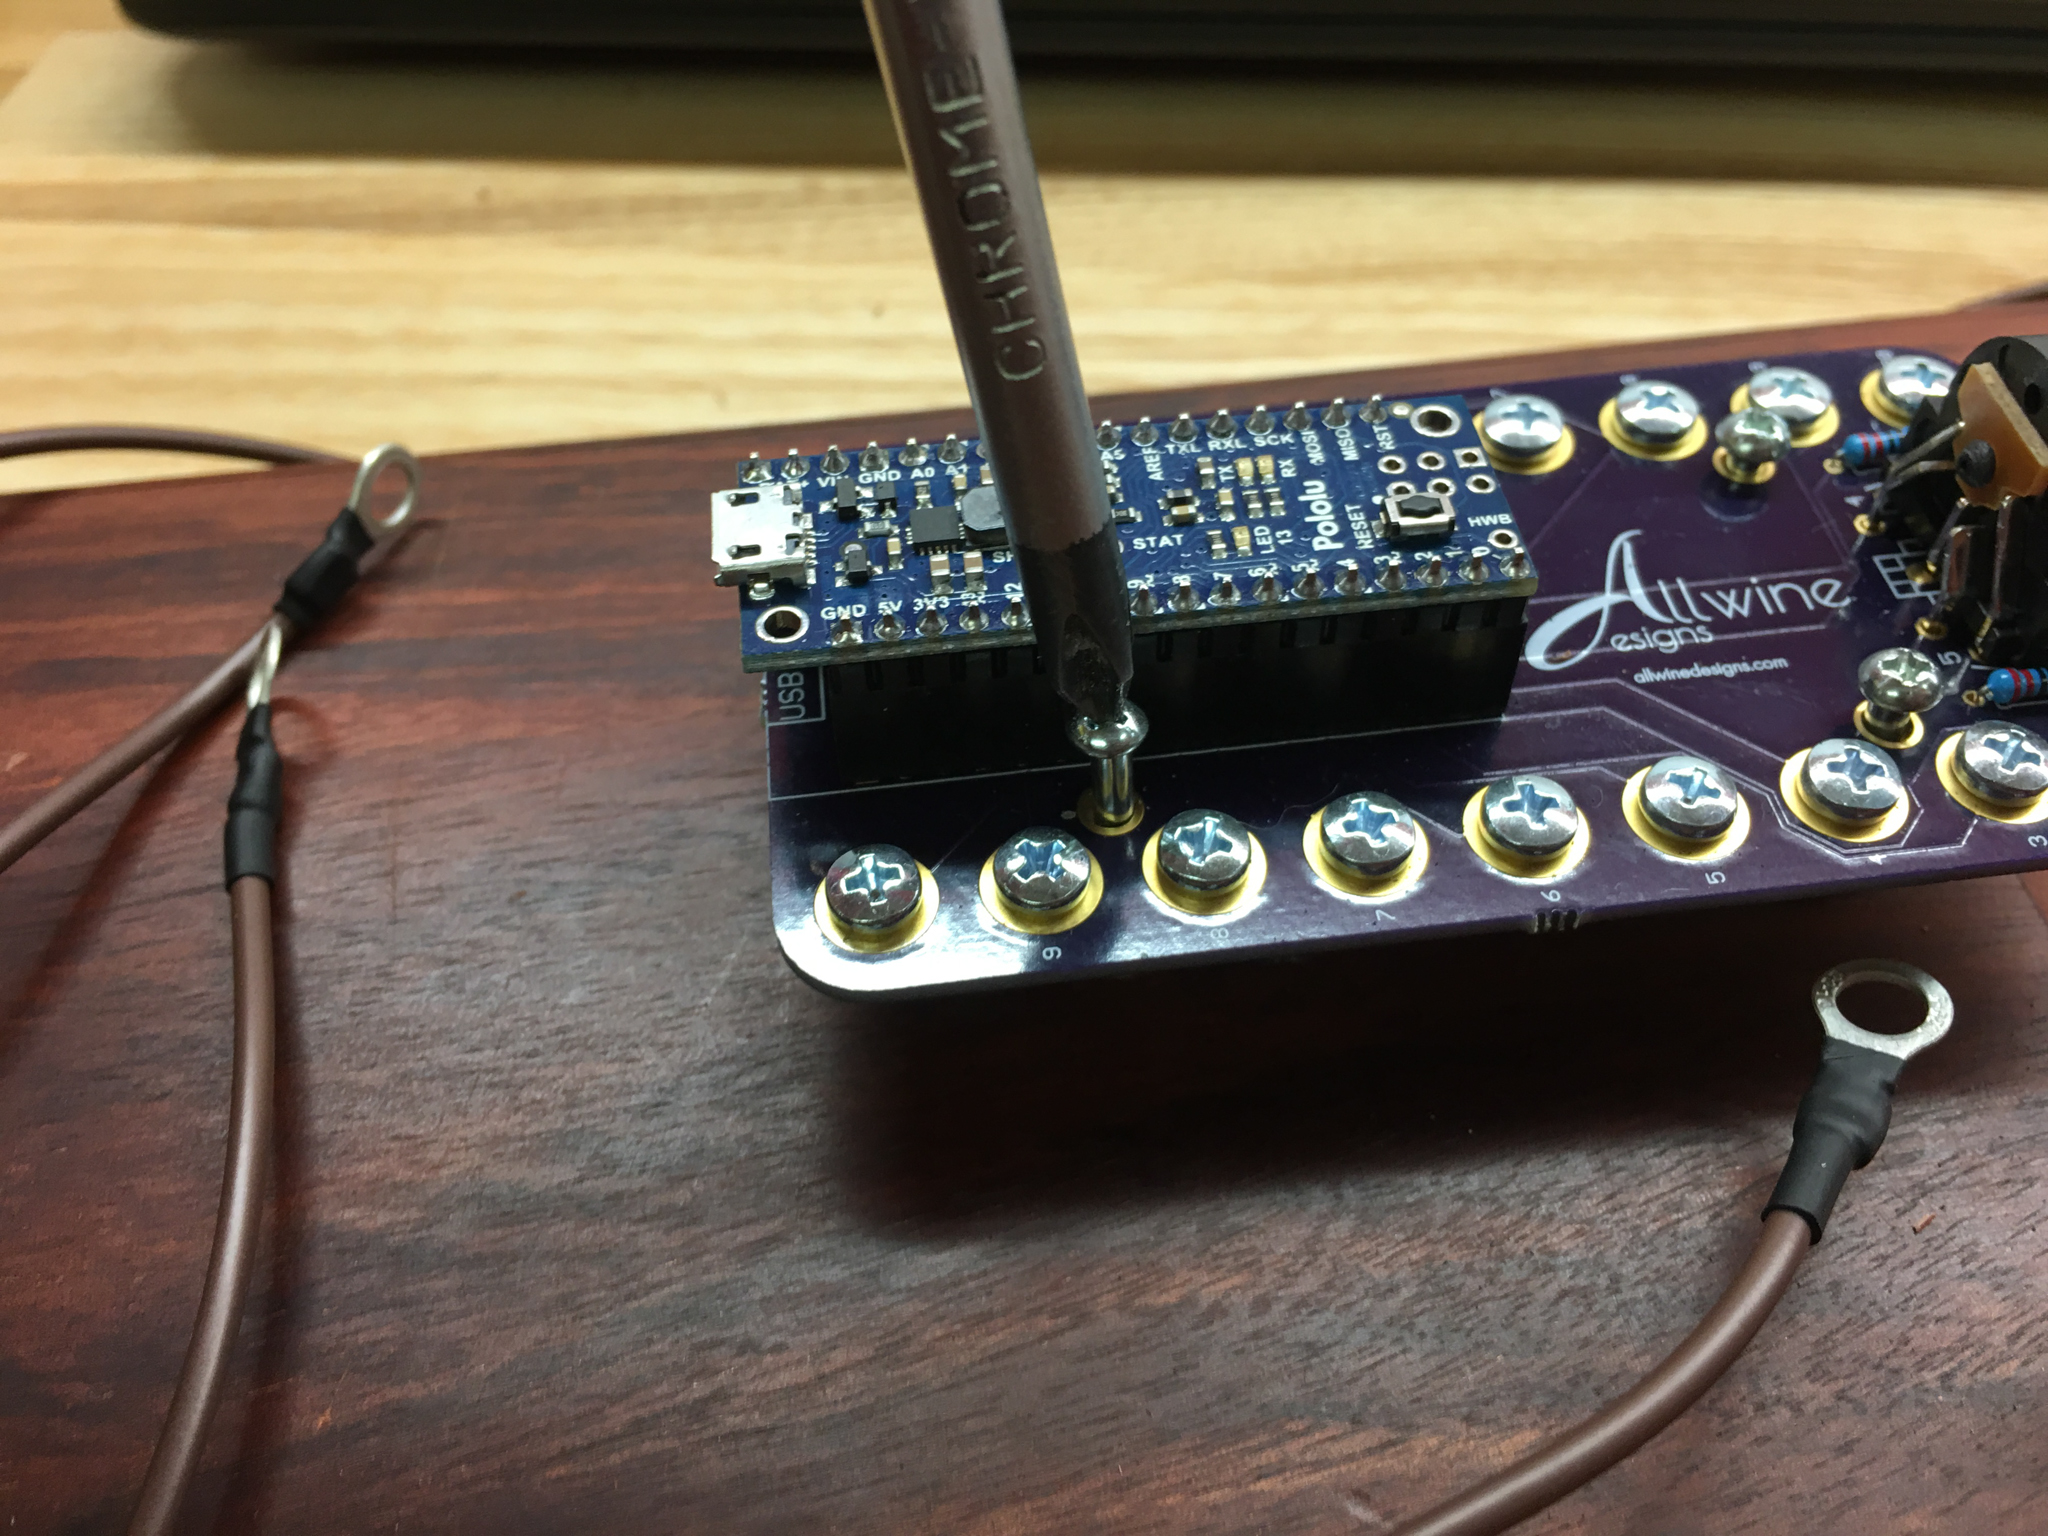
- Female headers - If you want the Arduino-compatible board to be removable, you can solder on these headers. Otherwise, you can just solder the Pololu to the MUSE PCB (I prefer having the headers, so I can pop out the Arduino and use it for other projects when I'm not actively using this Circle of Fifths).
- Pololu A-Star 32U4 Mini LV
- Wire Strippers
- Ring Terminals
Optionally:
- Laser Cutter - I don't have my Glowforge yet (won't until around August), but if you use that link to purchase one you'll get $100 off.
- Banana Jacks - Looks like these are out of stock, but you can find them on eBay.
- Banana Plugs - You only need these if you want to make an easily detachable connection point. You can just connect directly to the MUSE board using ring terminals.
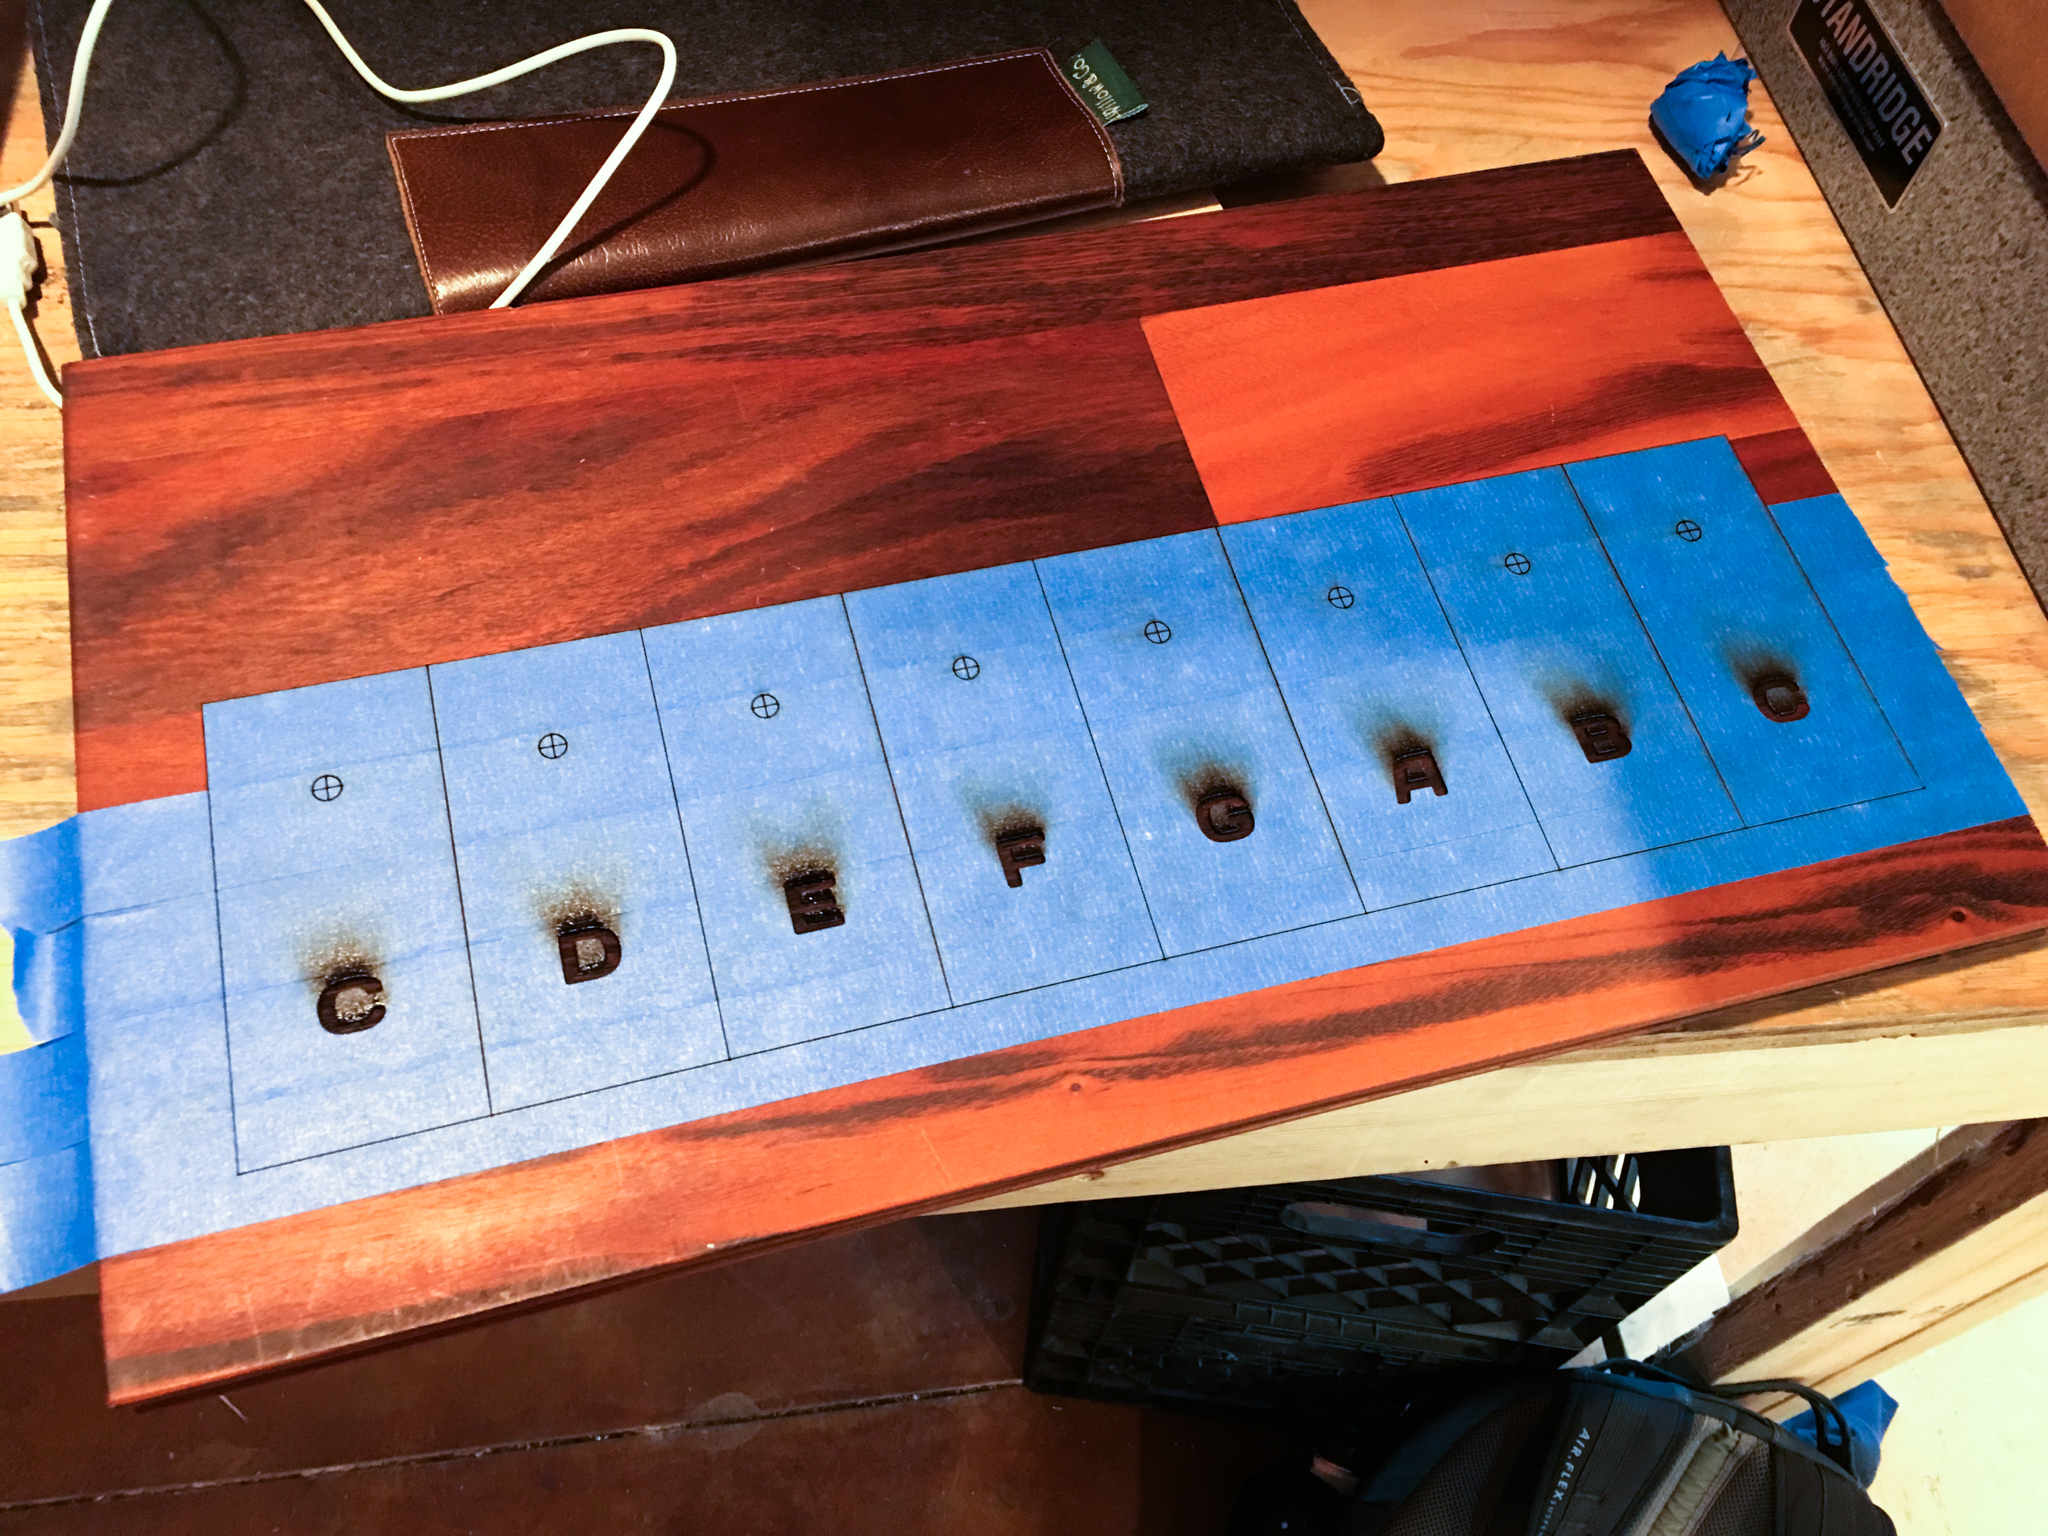
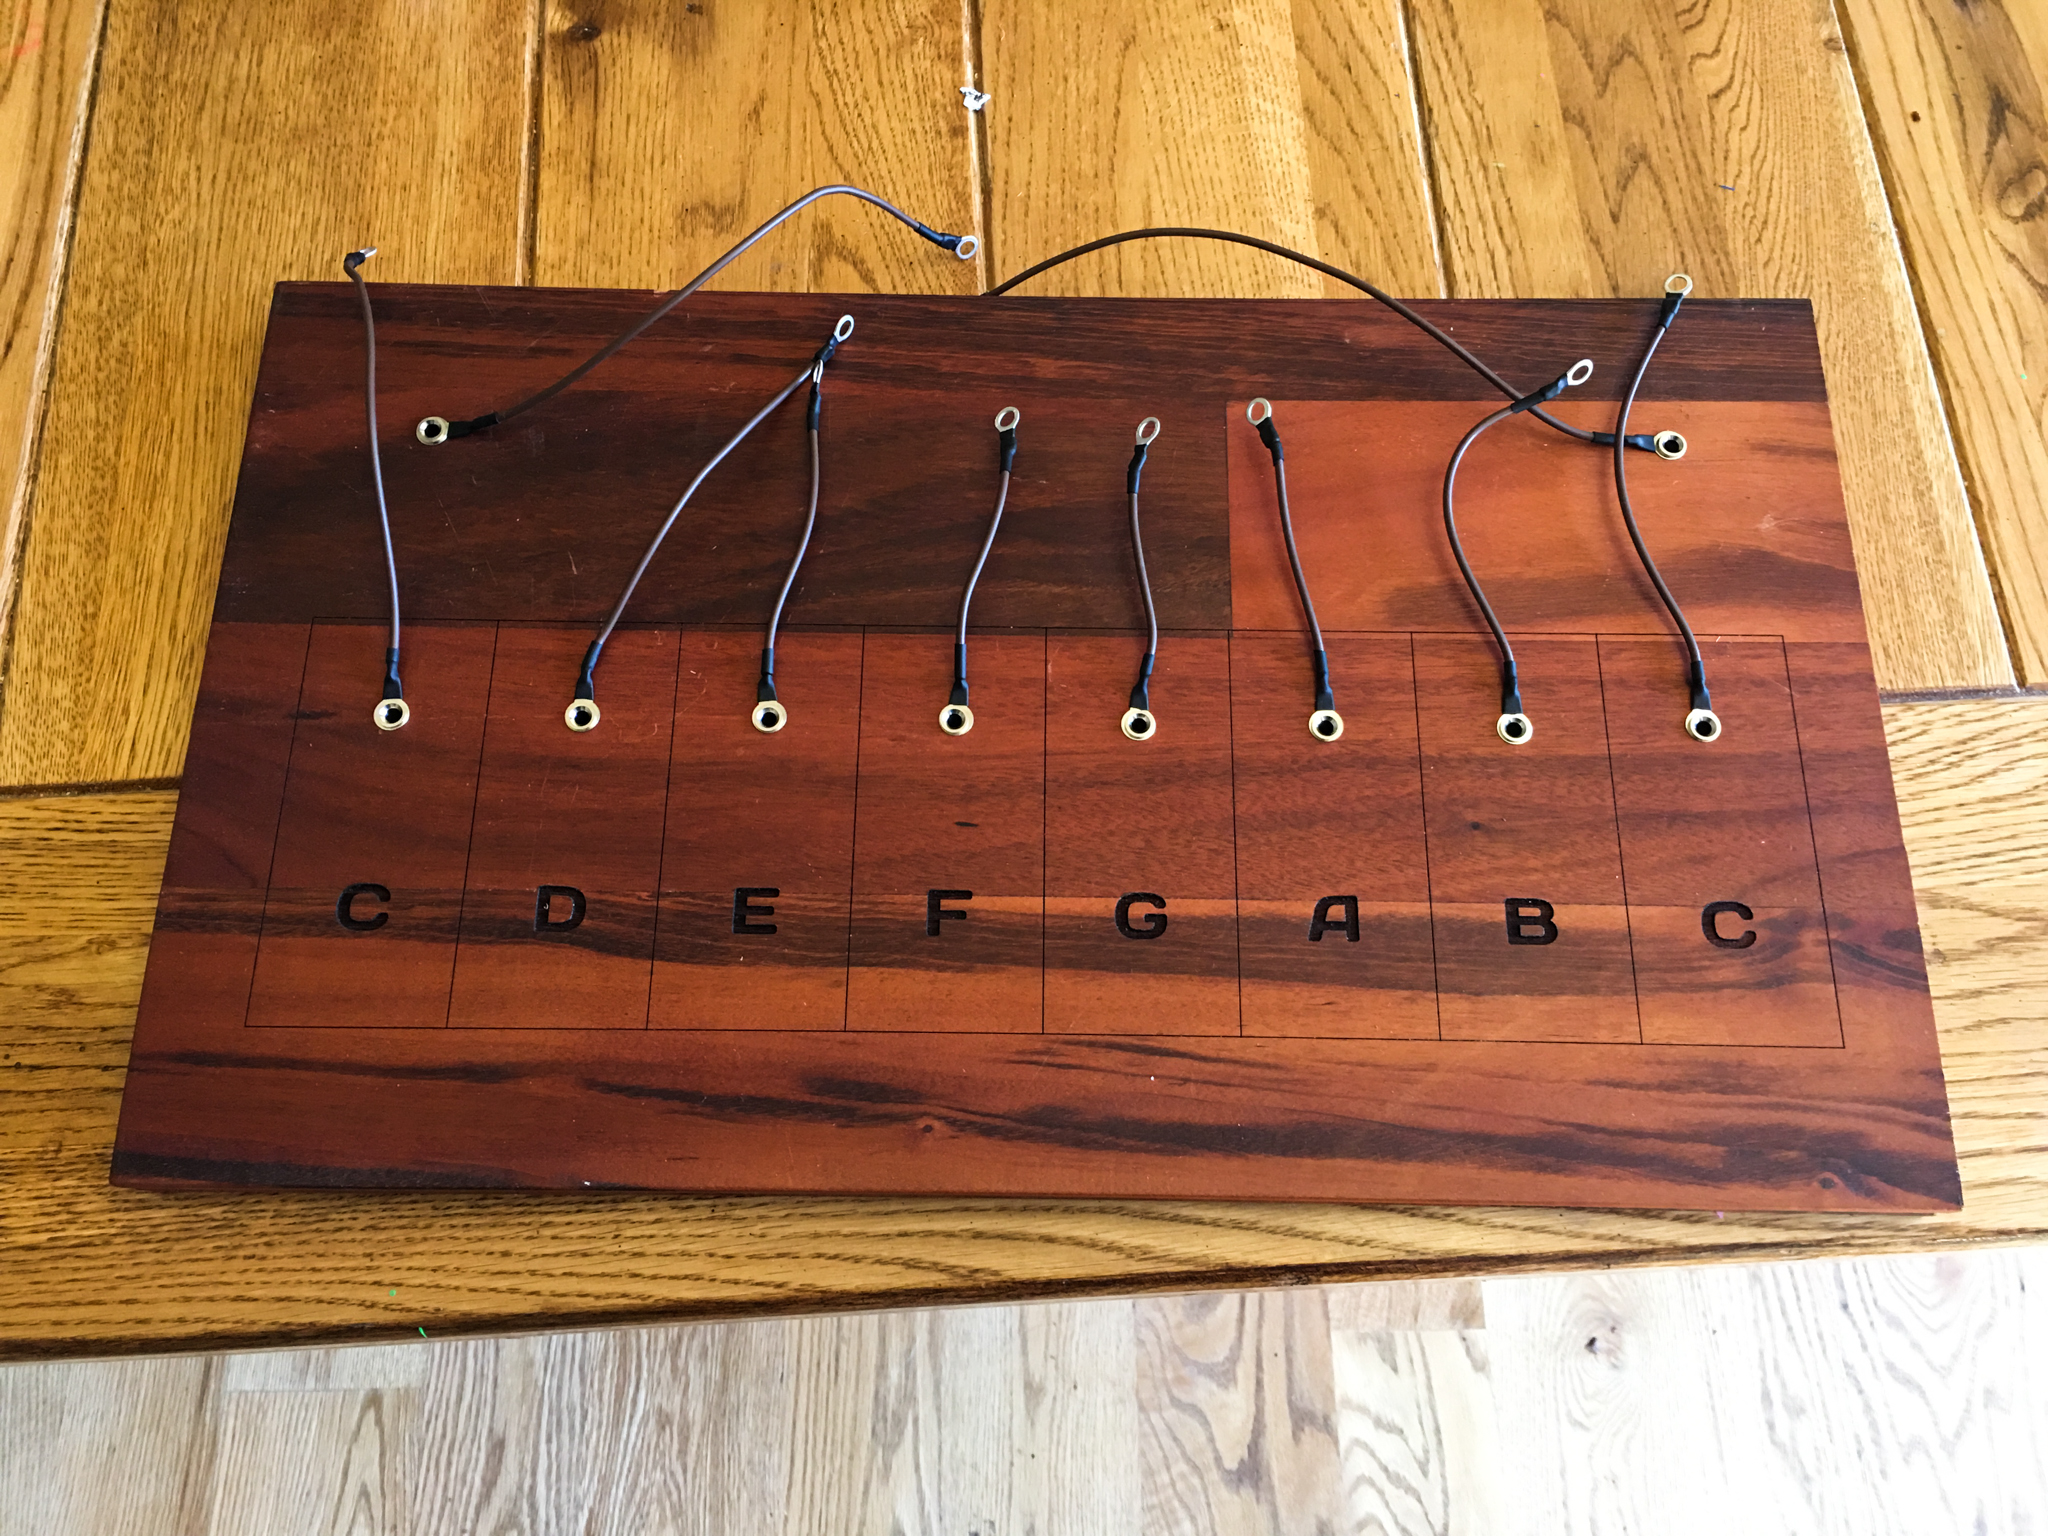
I knew that I wanted to make a single octave piano that could be connected to various things, so I made a design that could be laser engraved. The small circles are to indicate where I plan to drill 1/4" holes, that banana jacks will be inserted into. You'll see me do that below.
You can download the design as a PDF or SVG.
I used an Epilog Mini laser cutter to engrave the design onto a sample piece of flooring (a friend who used to work at a sustainable building supply store gave me a pile of them). It seemed to have the right kind of dimensions and already had a nice finish, so I gave it a shot. I first taped the wood with painter's tape to avoid scorch marks. I didn't want to have to sand it and refinish it, so that was key. I turned the power settings to maximum and slowed the speed down to somewhere around 40-50% so I'd get a nice deep engraving.
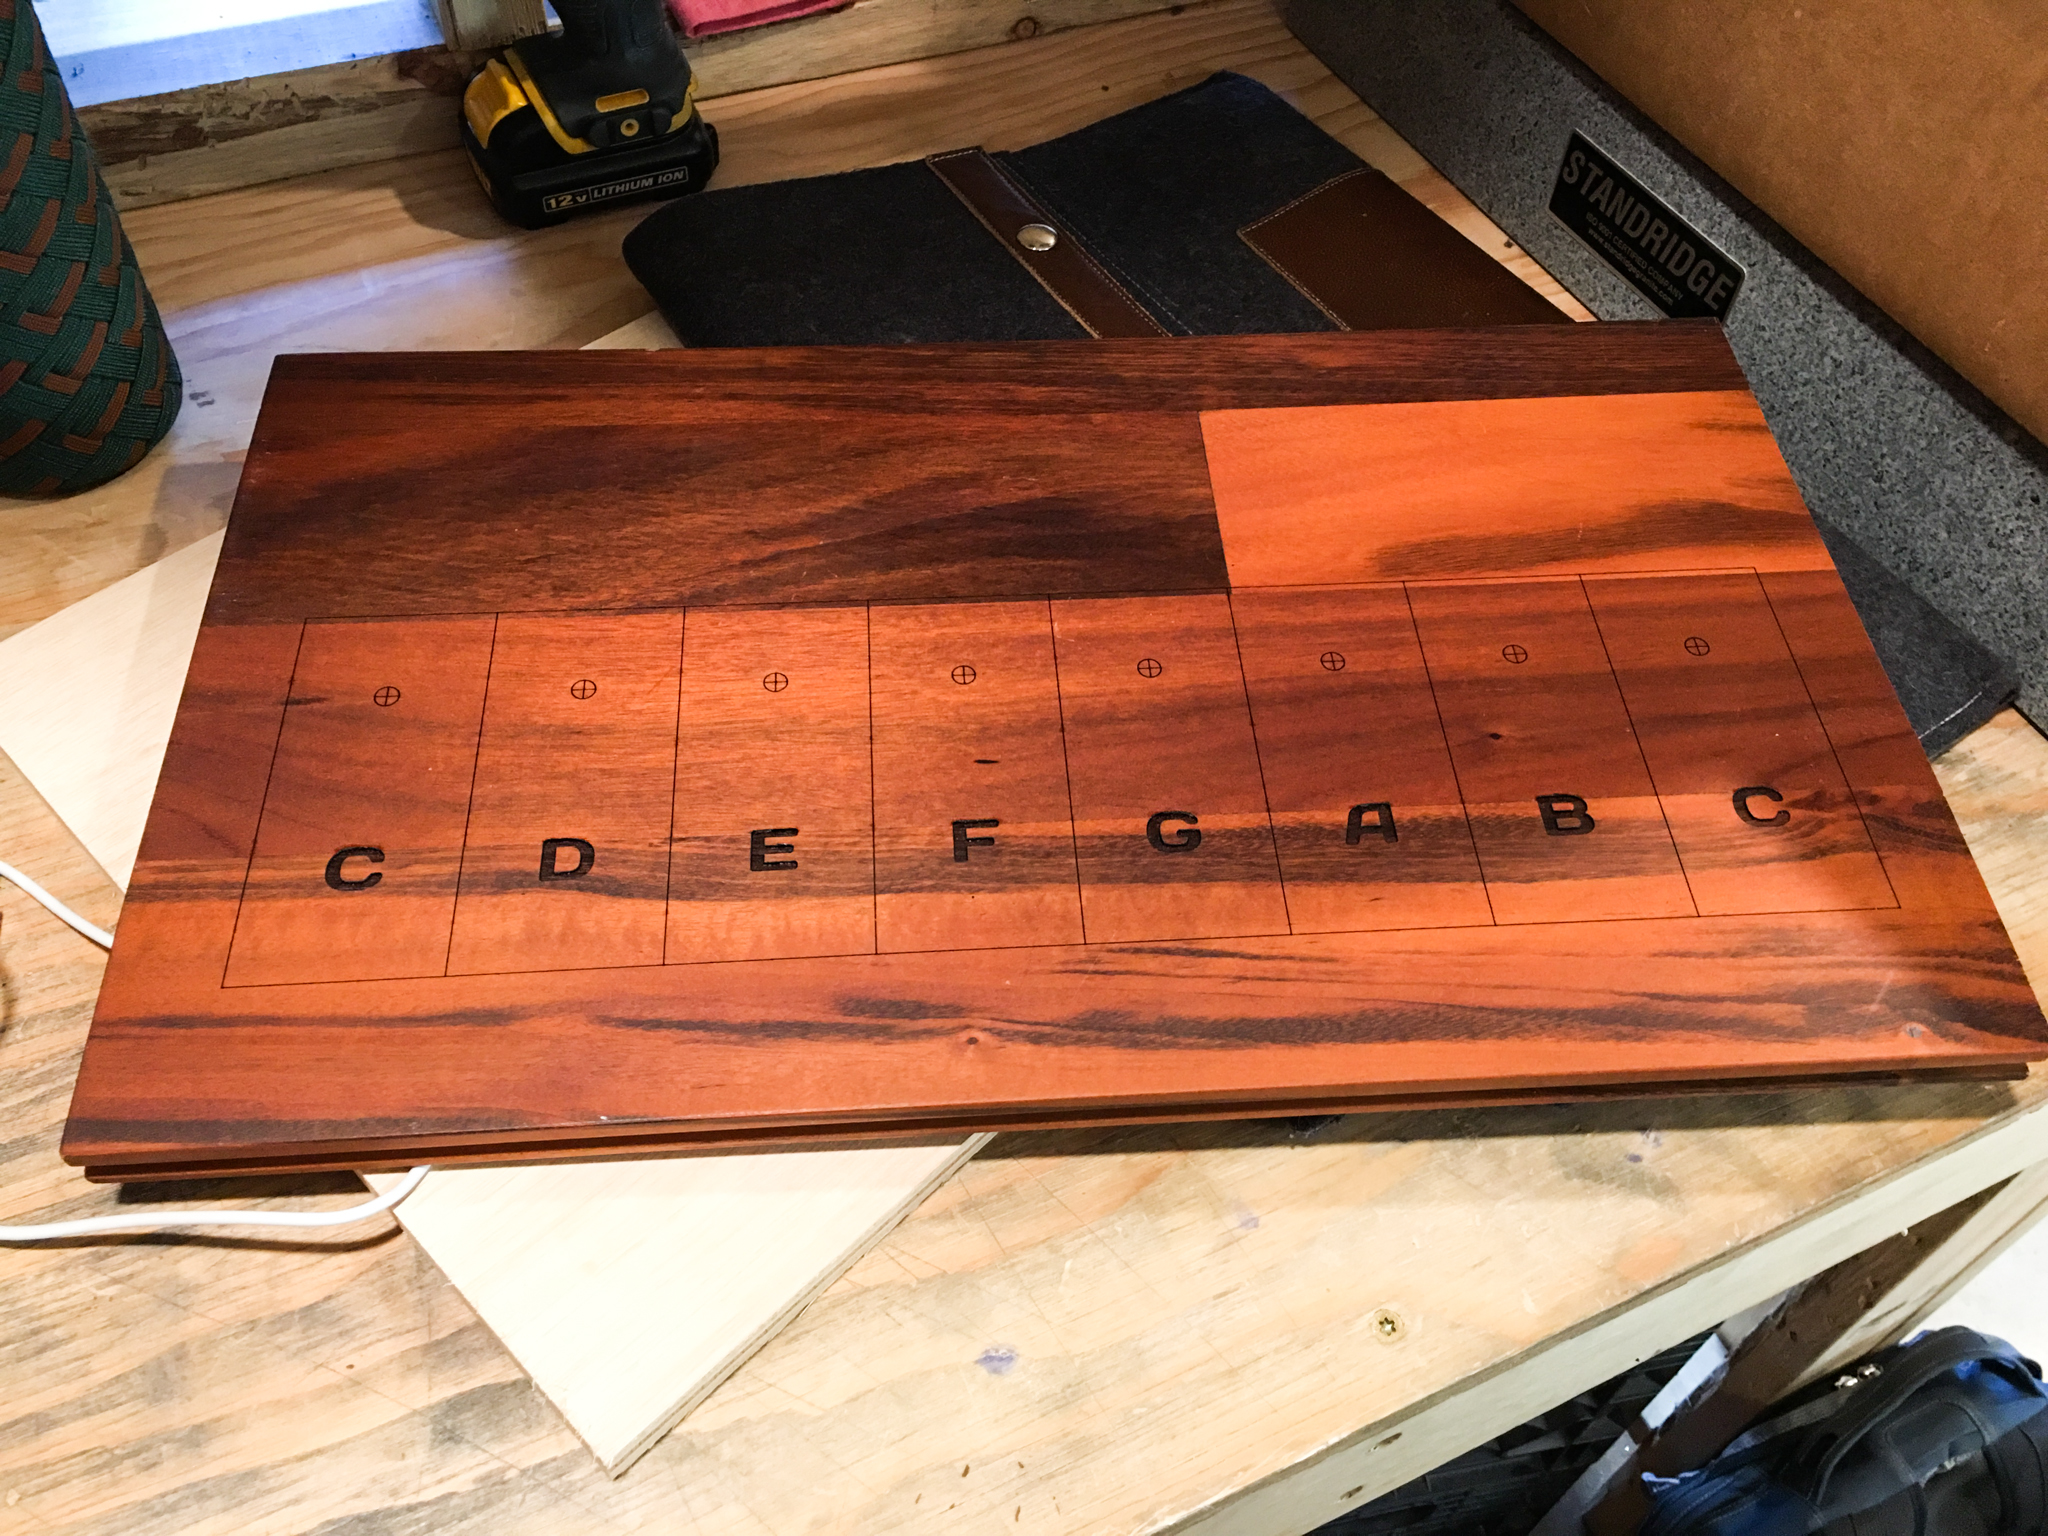
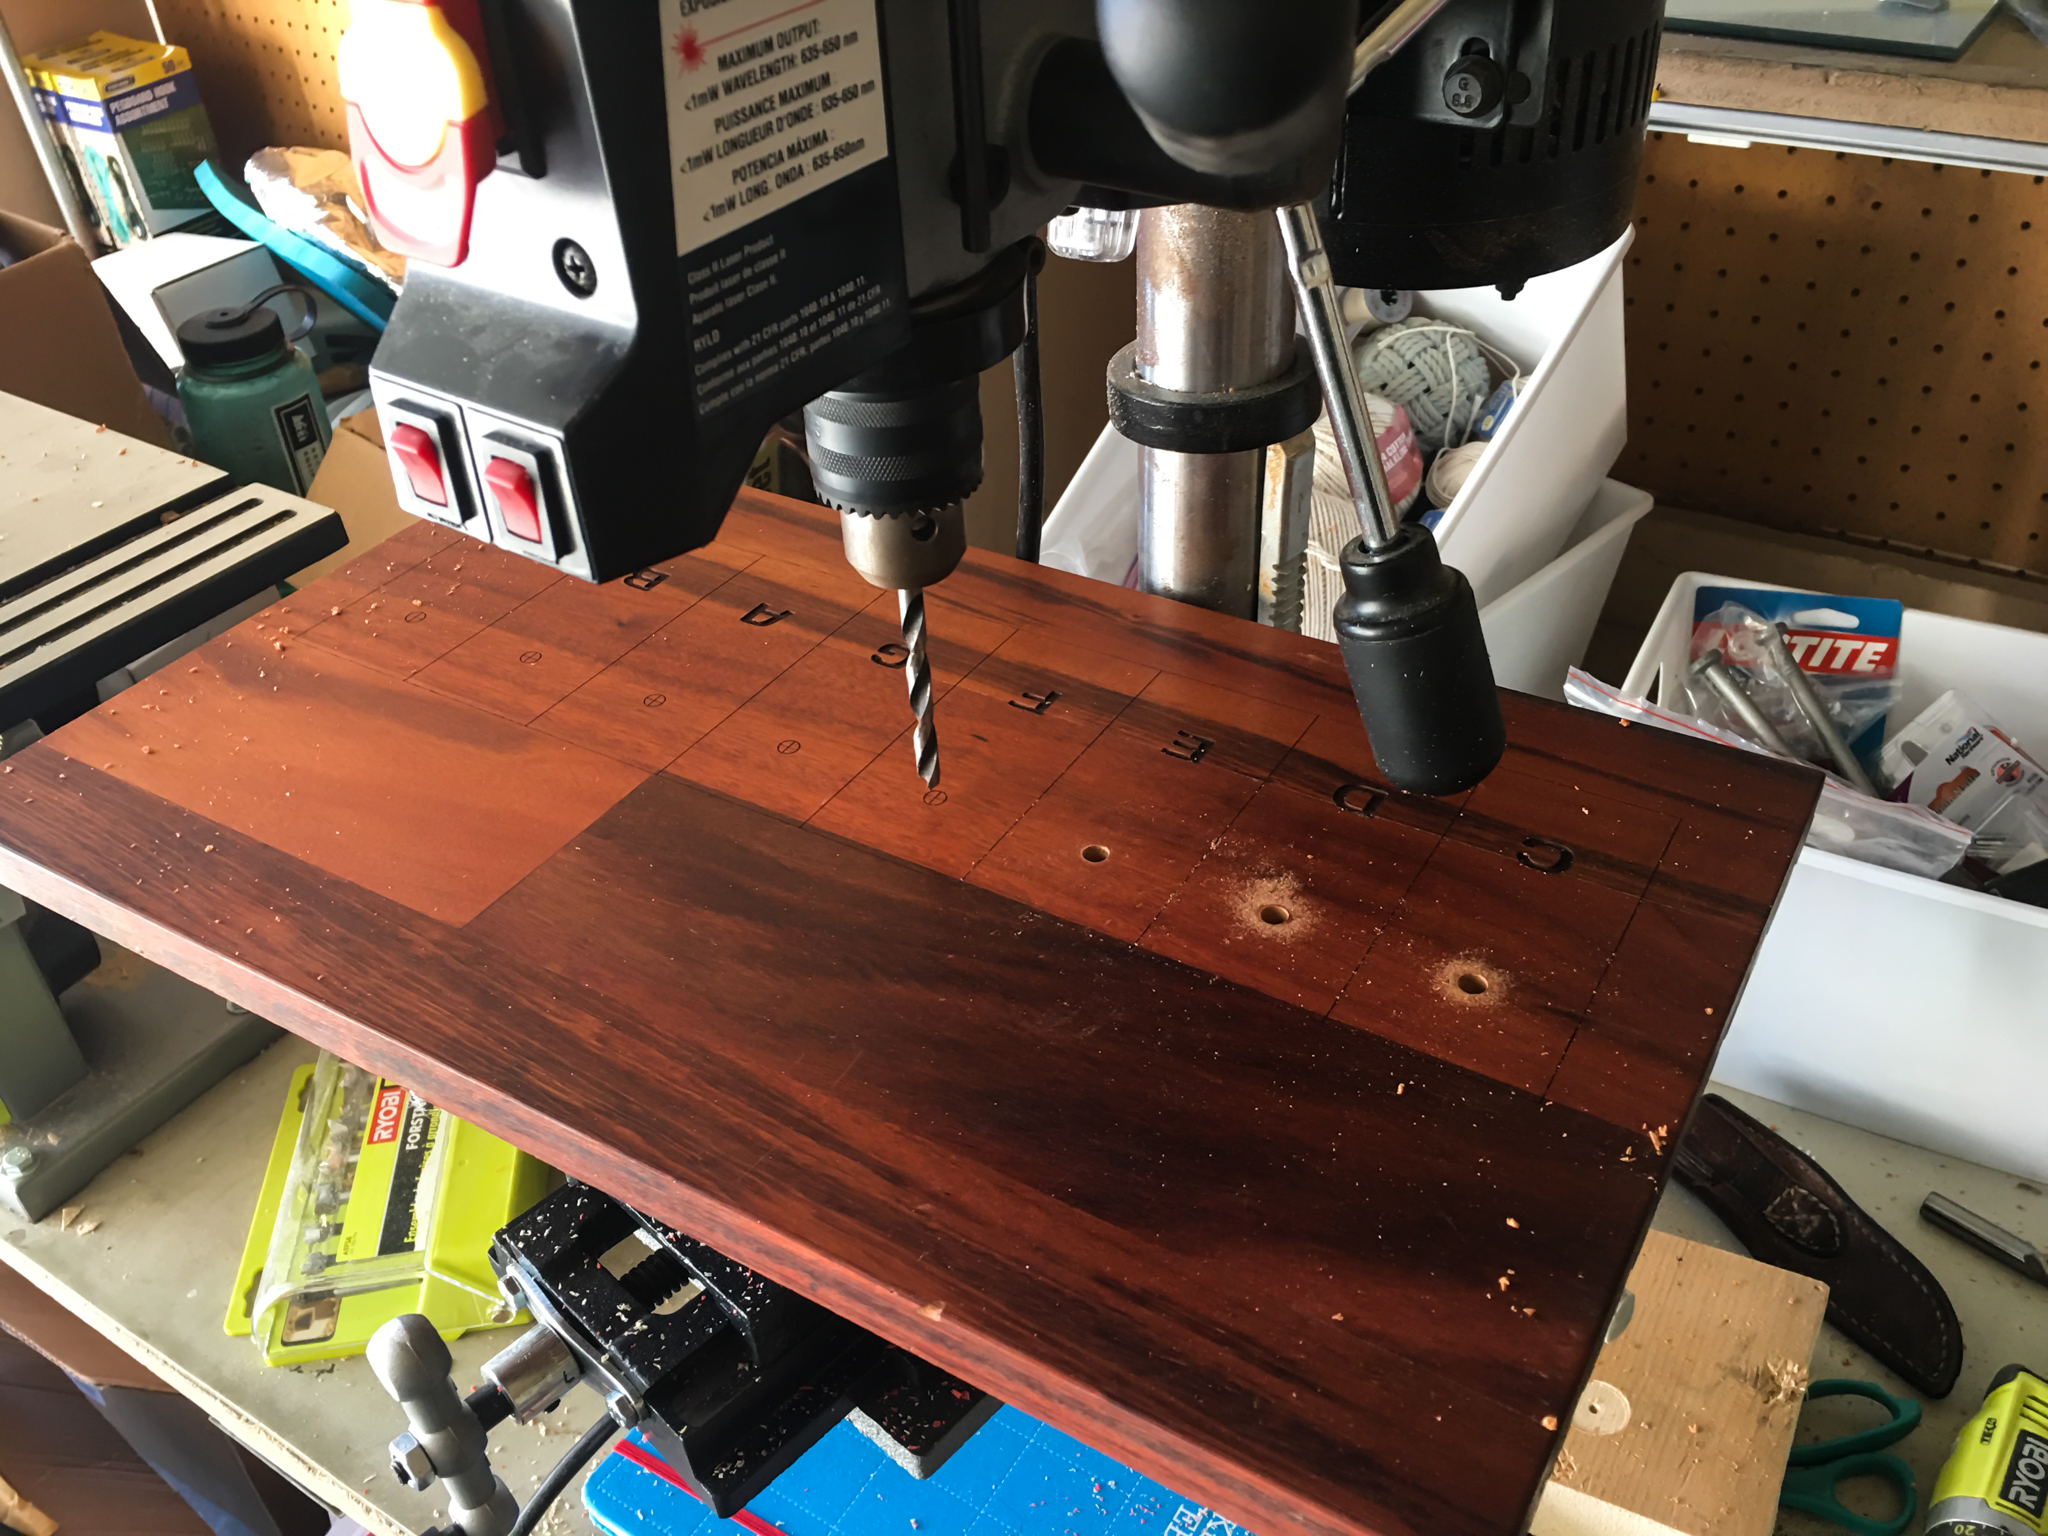
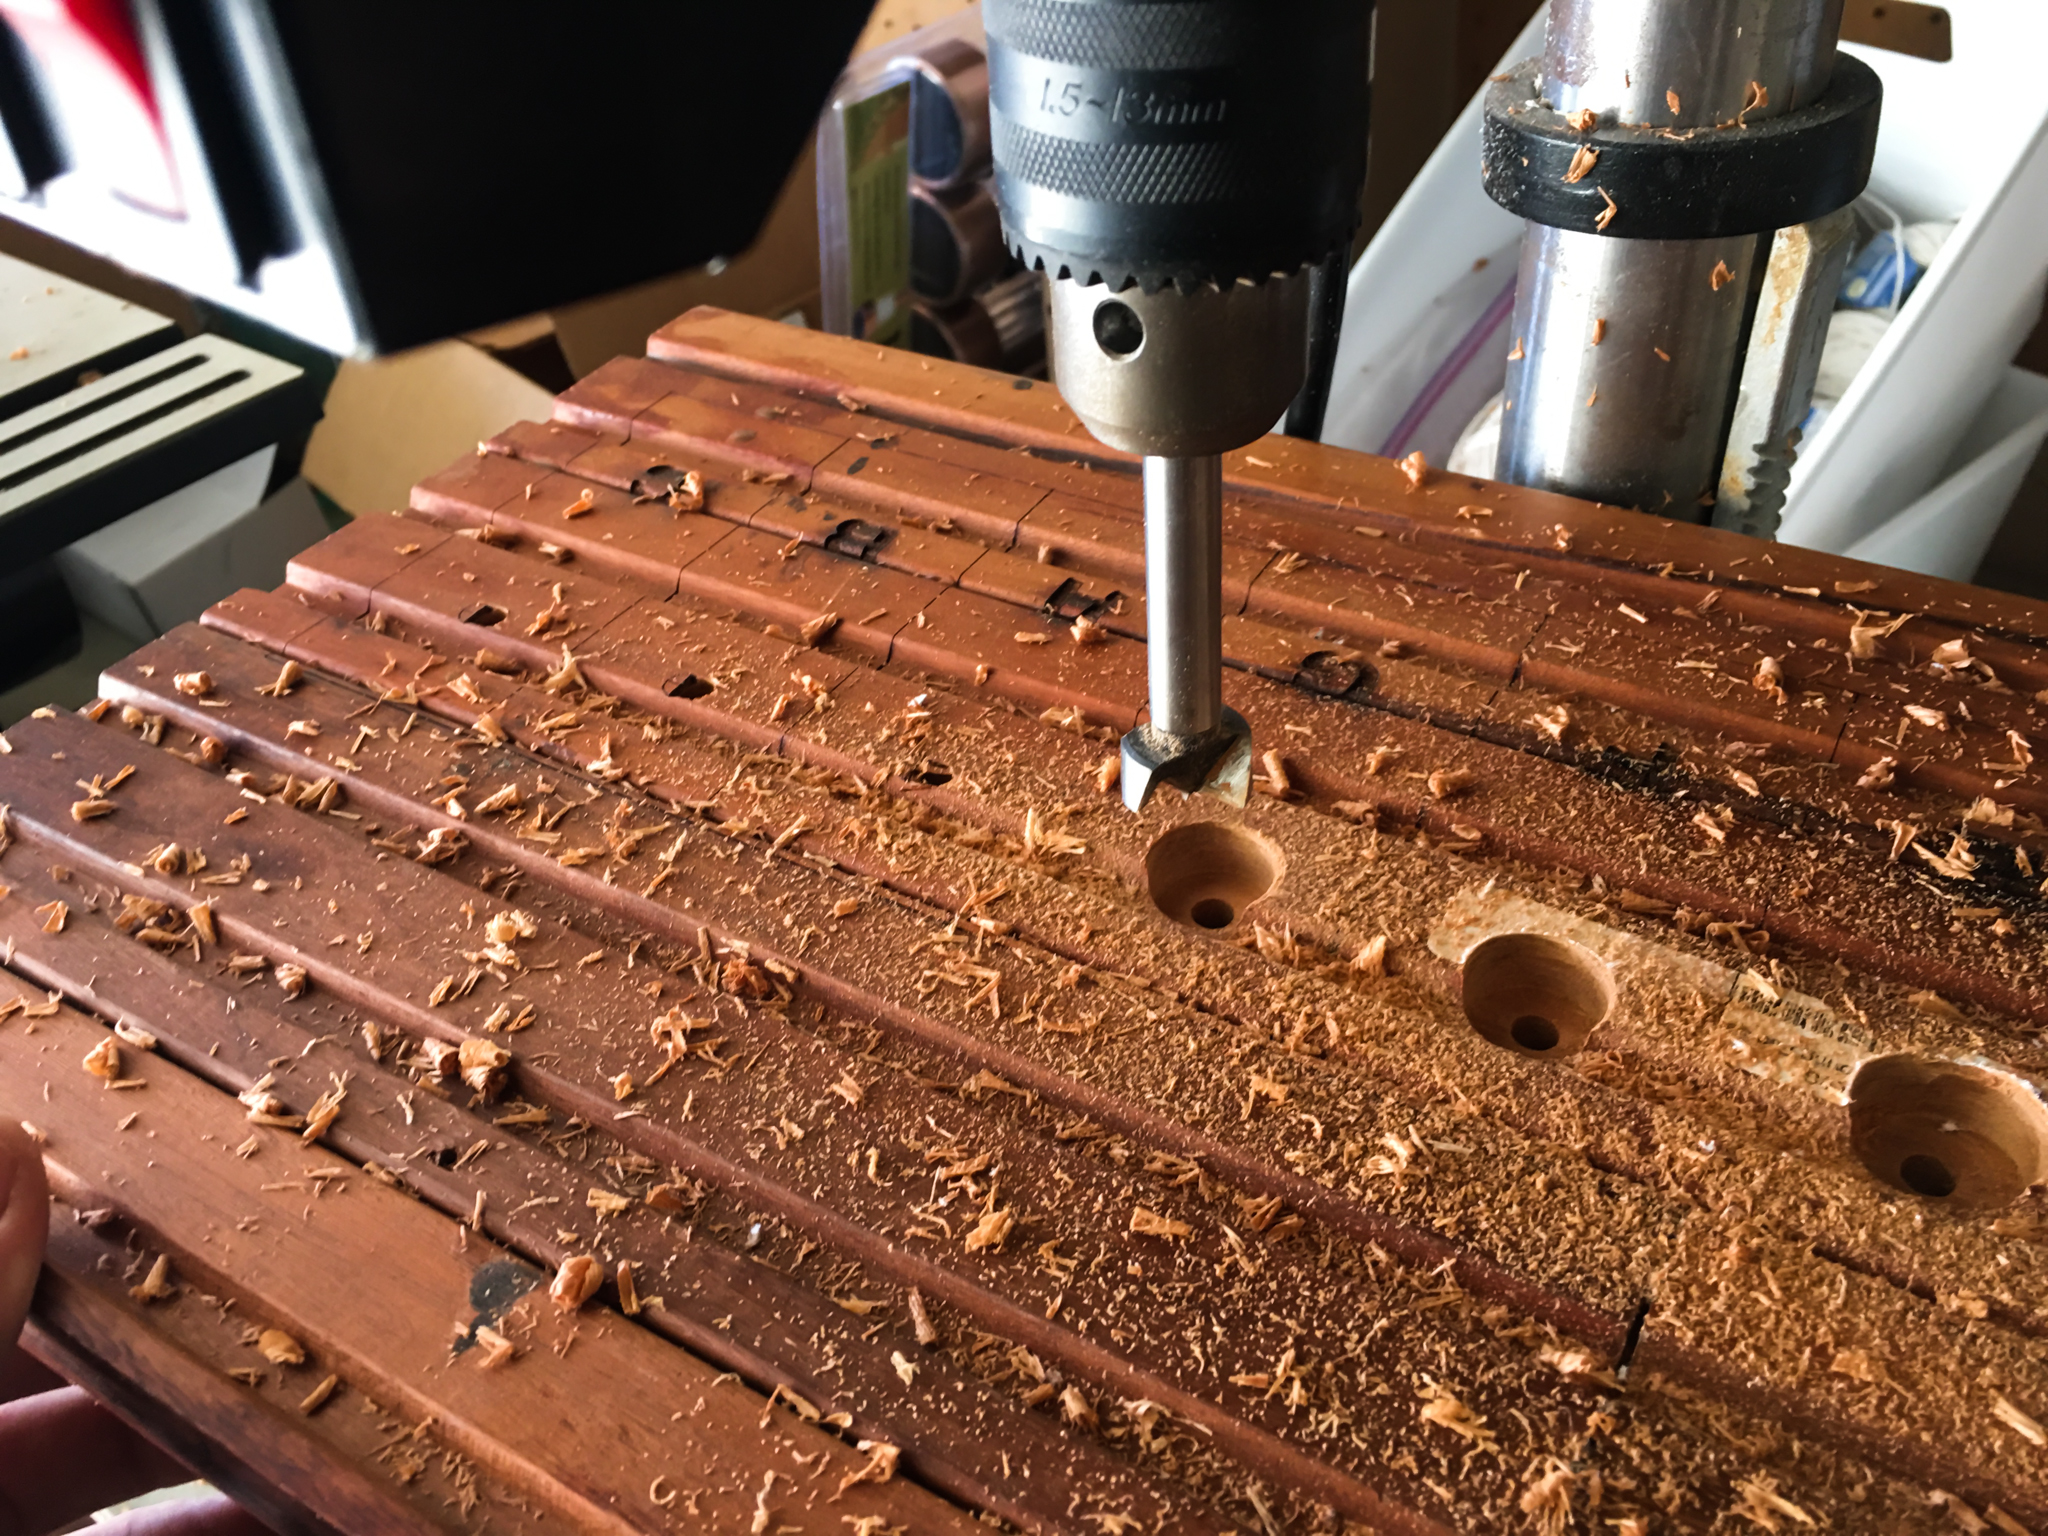
Then, I used my drill press to drill the 1/4" holes in the board. I also drilled a couple extra holes above the engraving for ground wires. To play the piano, you'll need to touch a ground wire and then touch one of the notes to trigger a MIDI event. The board was thick enough that my banana jacks wouldn't fit through it, so I also had to counter bore some bigger holes on the back so there was enough room for the banana jacks' hex nuts.
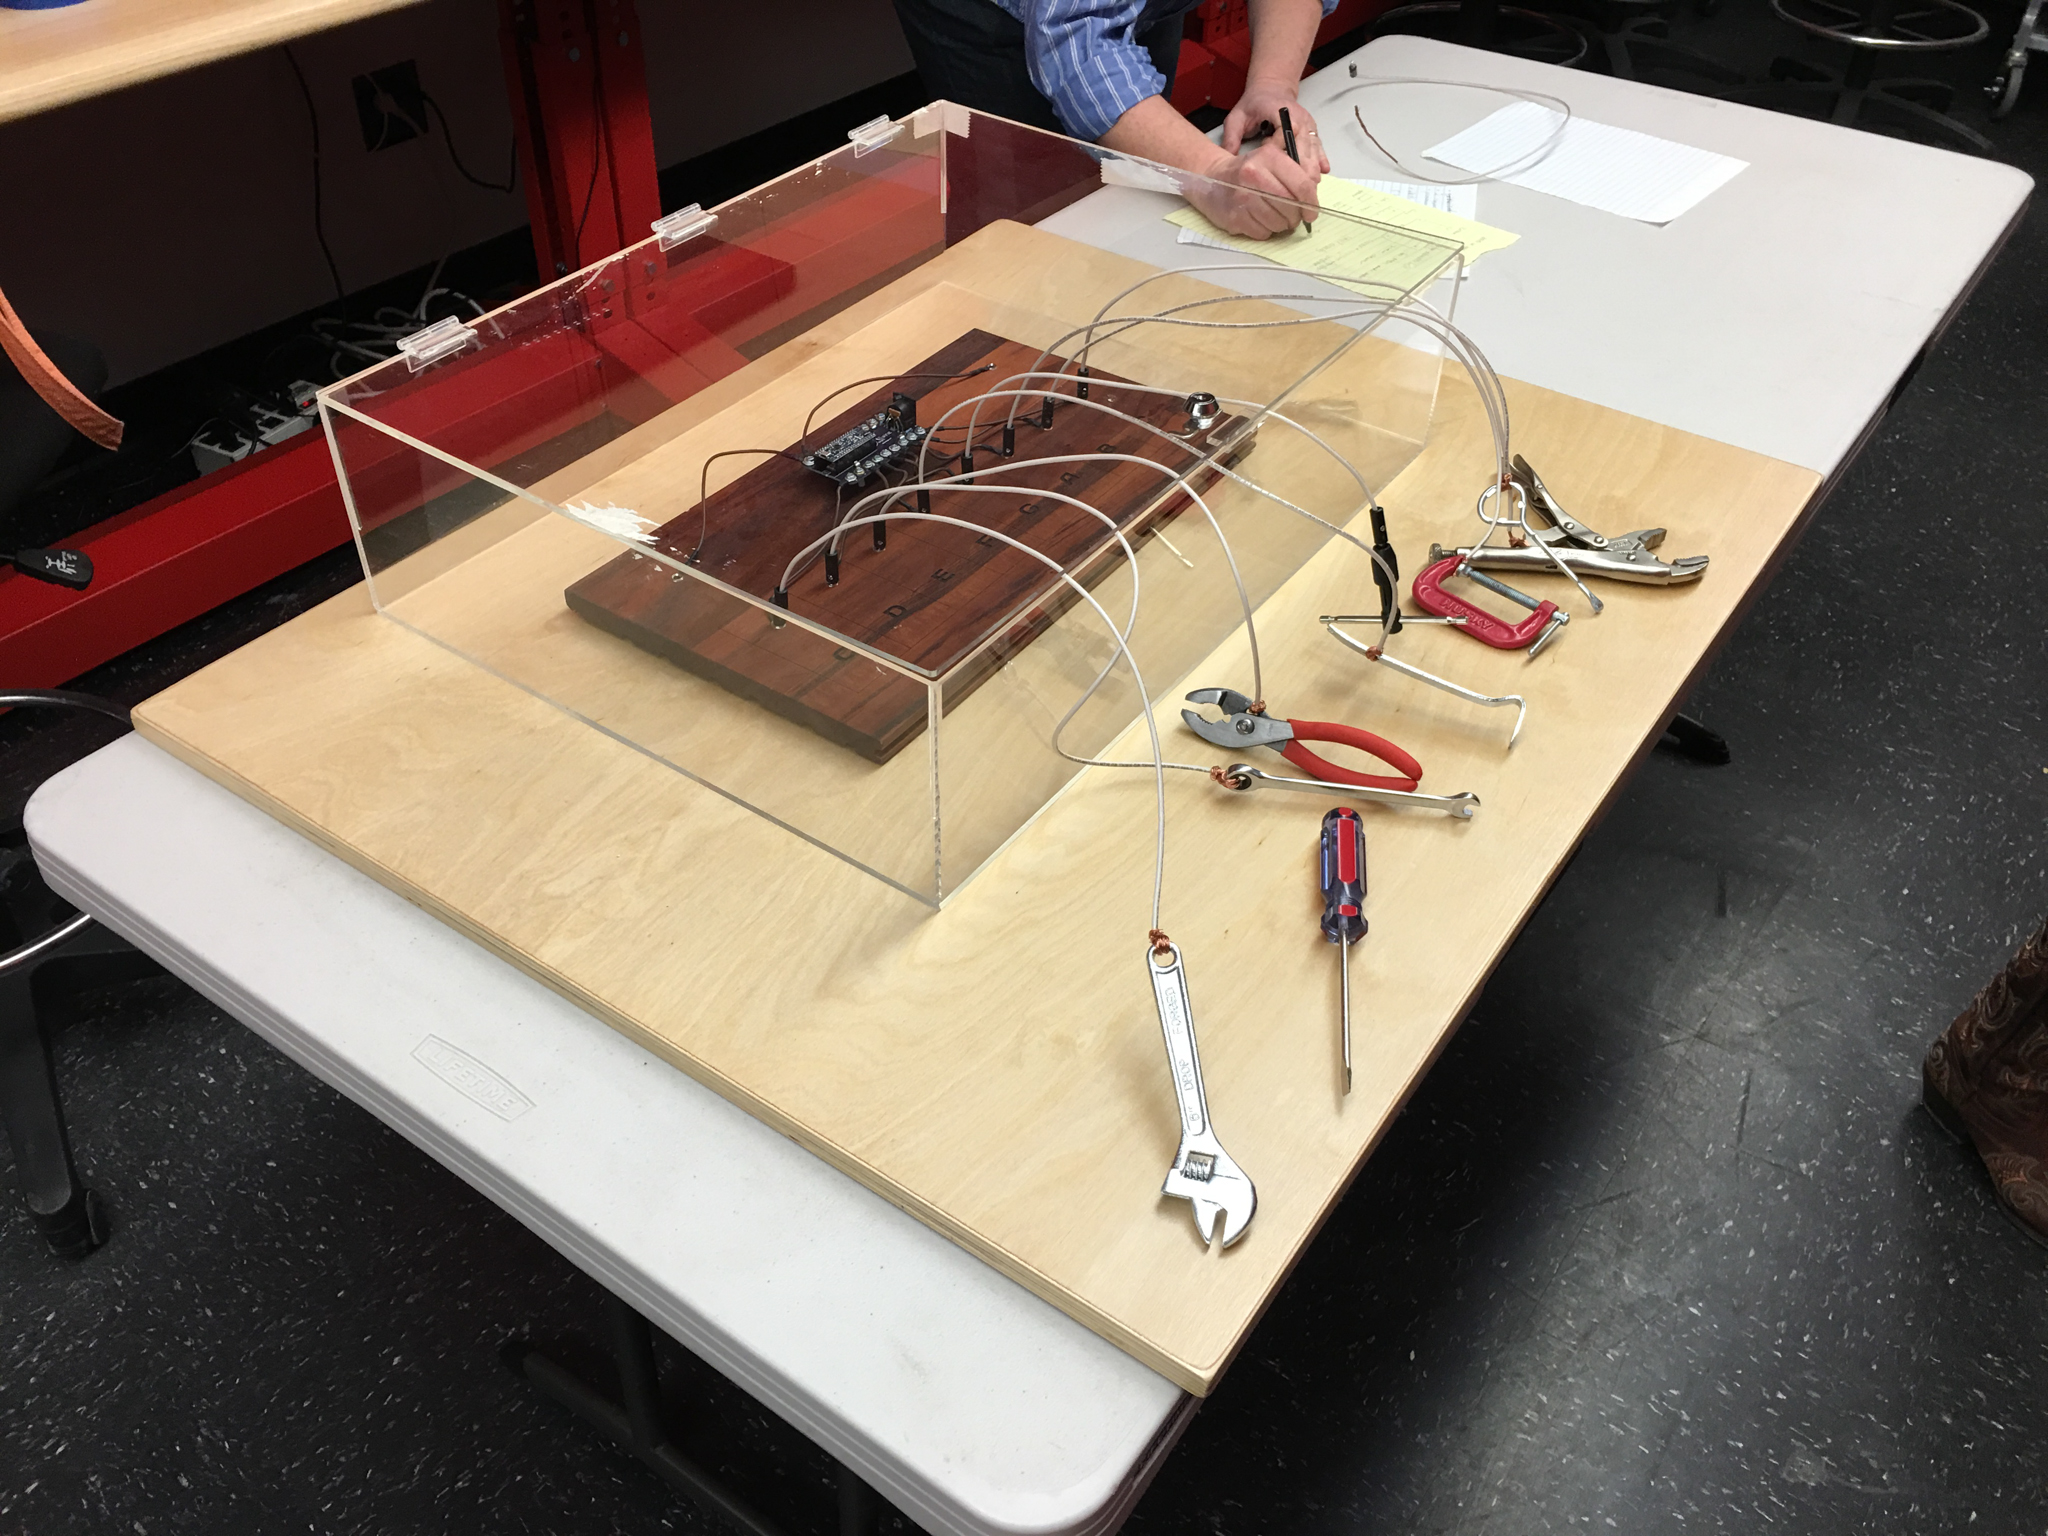
Next, I cut some wire to length, soldering one end to the banana jacks and crimped ring terminals on the other so they could easily be attached to the MUSE board's M3 screws. I mounted the MUSE board at the top and wired them up. It's not all that important which pins to wire them to, we'll just program in the notes based on which pins were chosen. Then wire the ground pins to the GND pin on the MUSE board.
After coding up the controller to output MIDI notes based on which pin you press (see below), I tested everything out by wiring up some tools. Everyone liked the tools, so that stuck and turned into the Toolbox Piano. The awesome staff at the Children's Museum was able to finish up the rest of the exhibit by ordering an acrylic box, mounting it to a table, hiding a MIDI keyboard underneath and affixing the tools around the box. Here are some shots setting up the acrylic box.
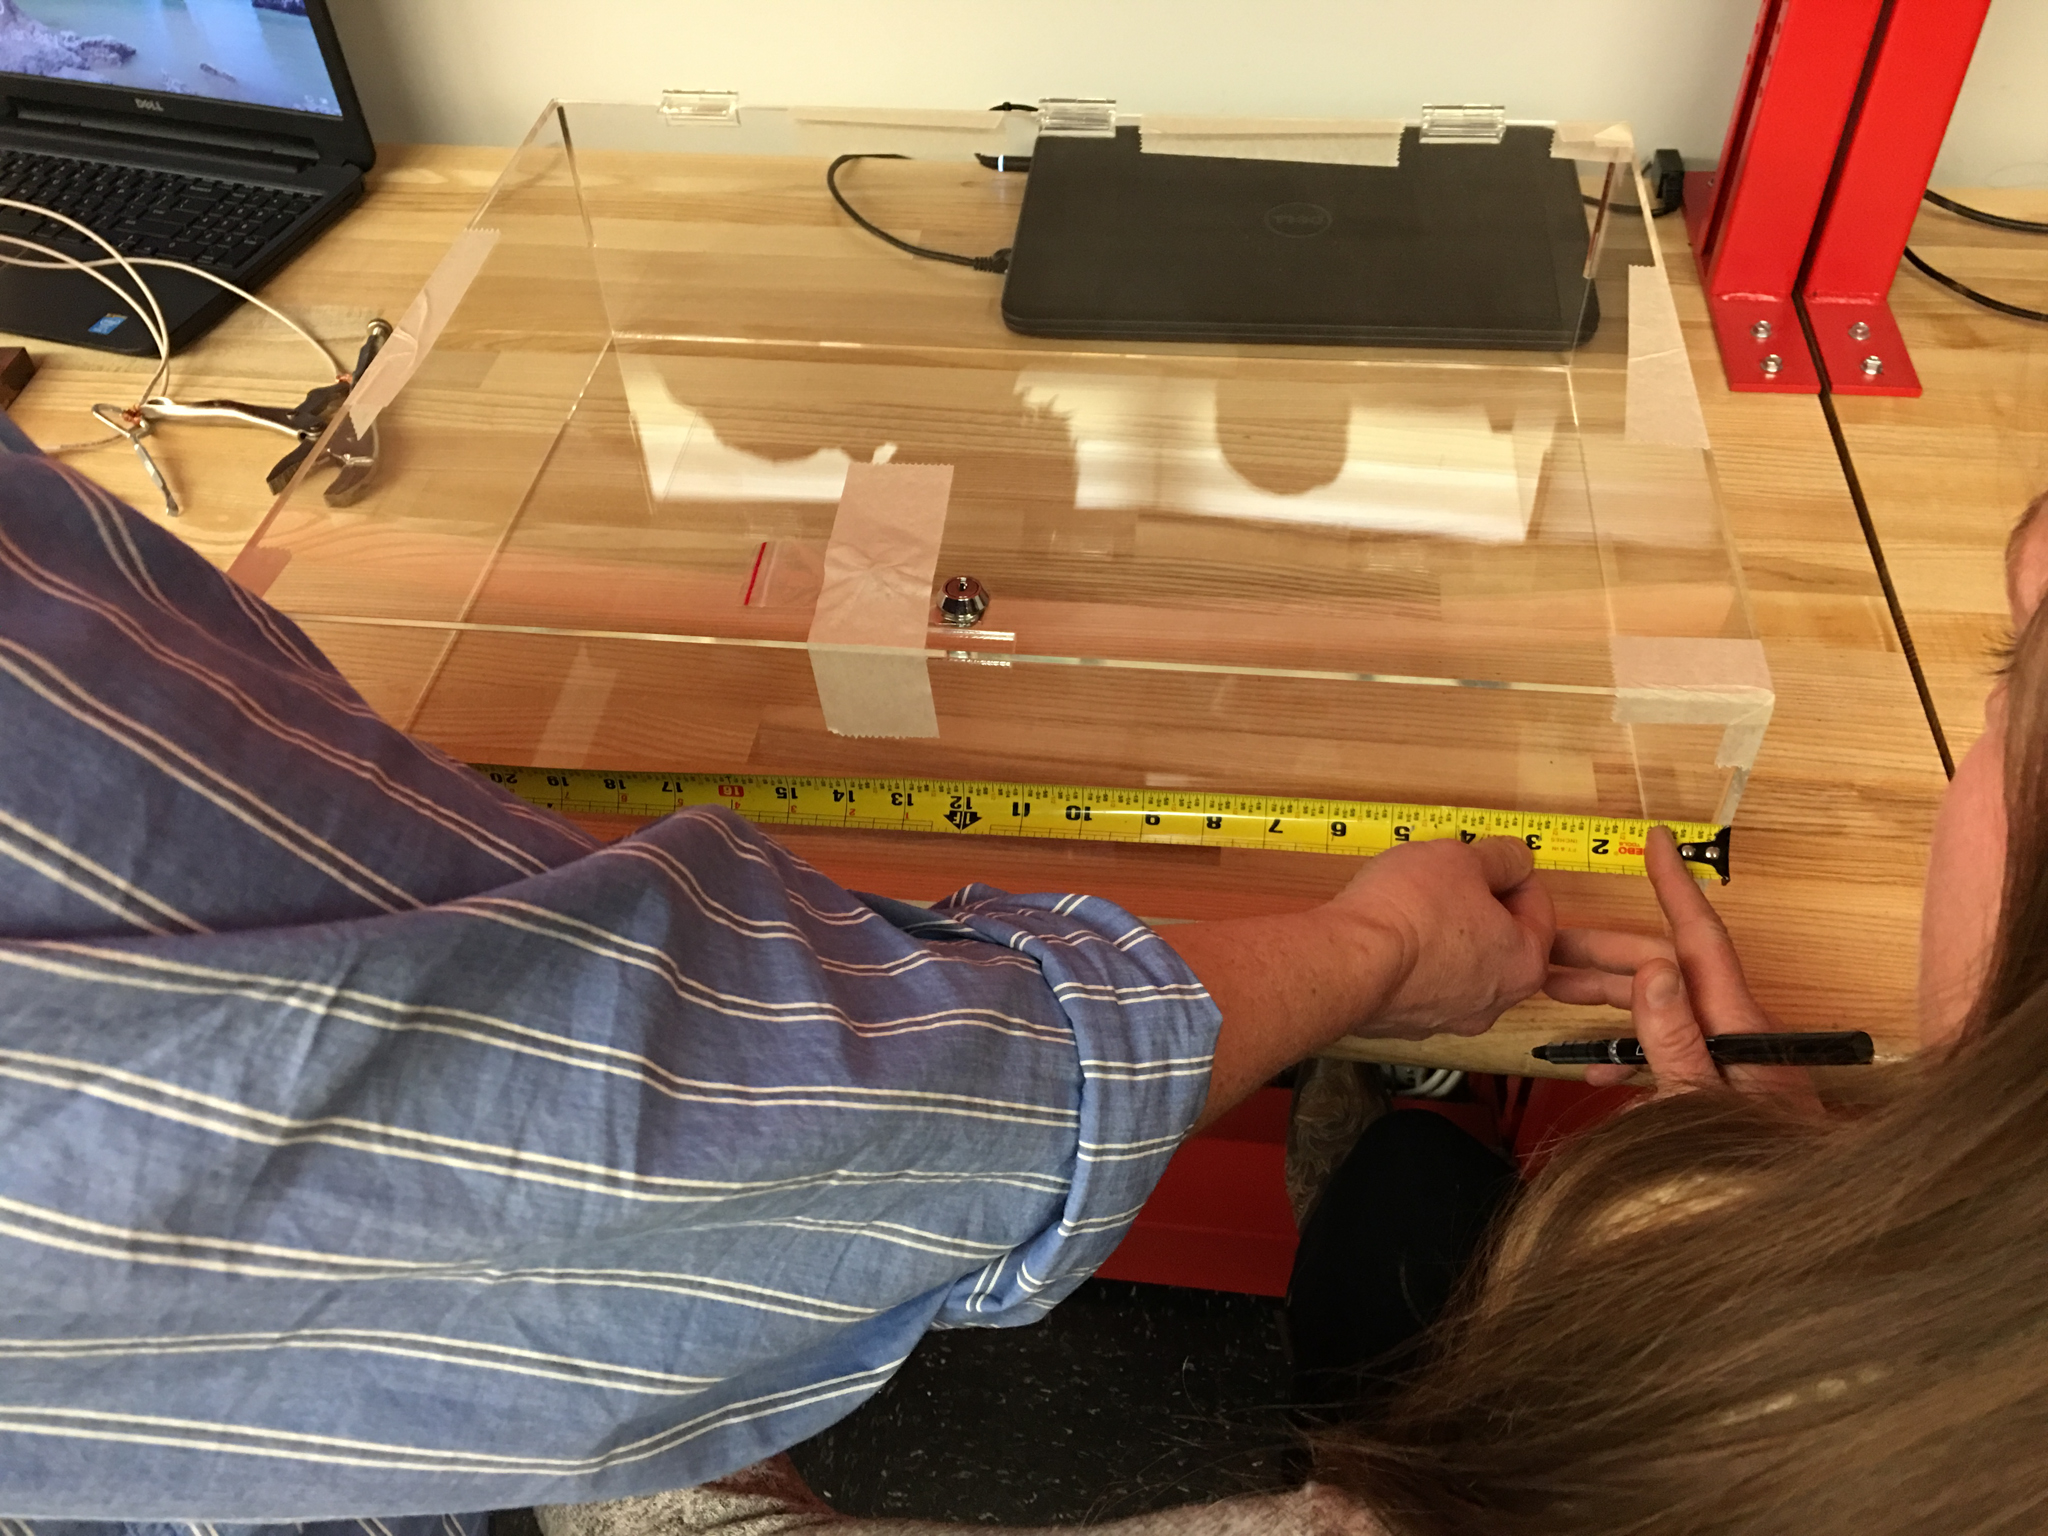
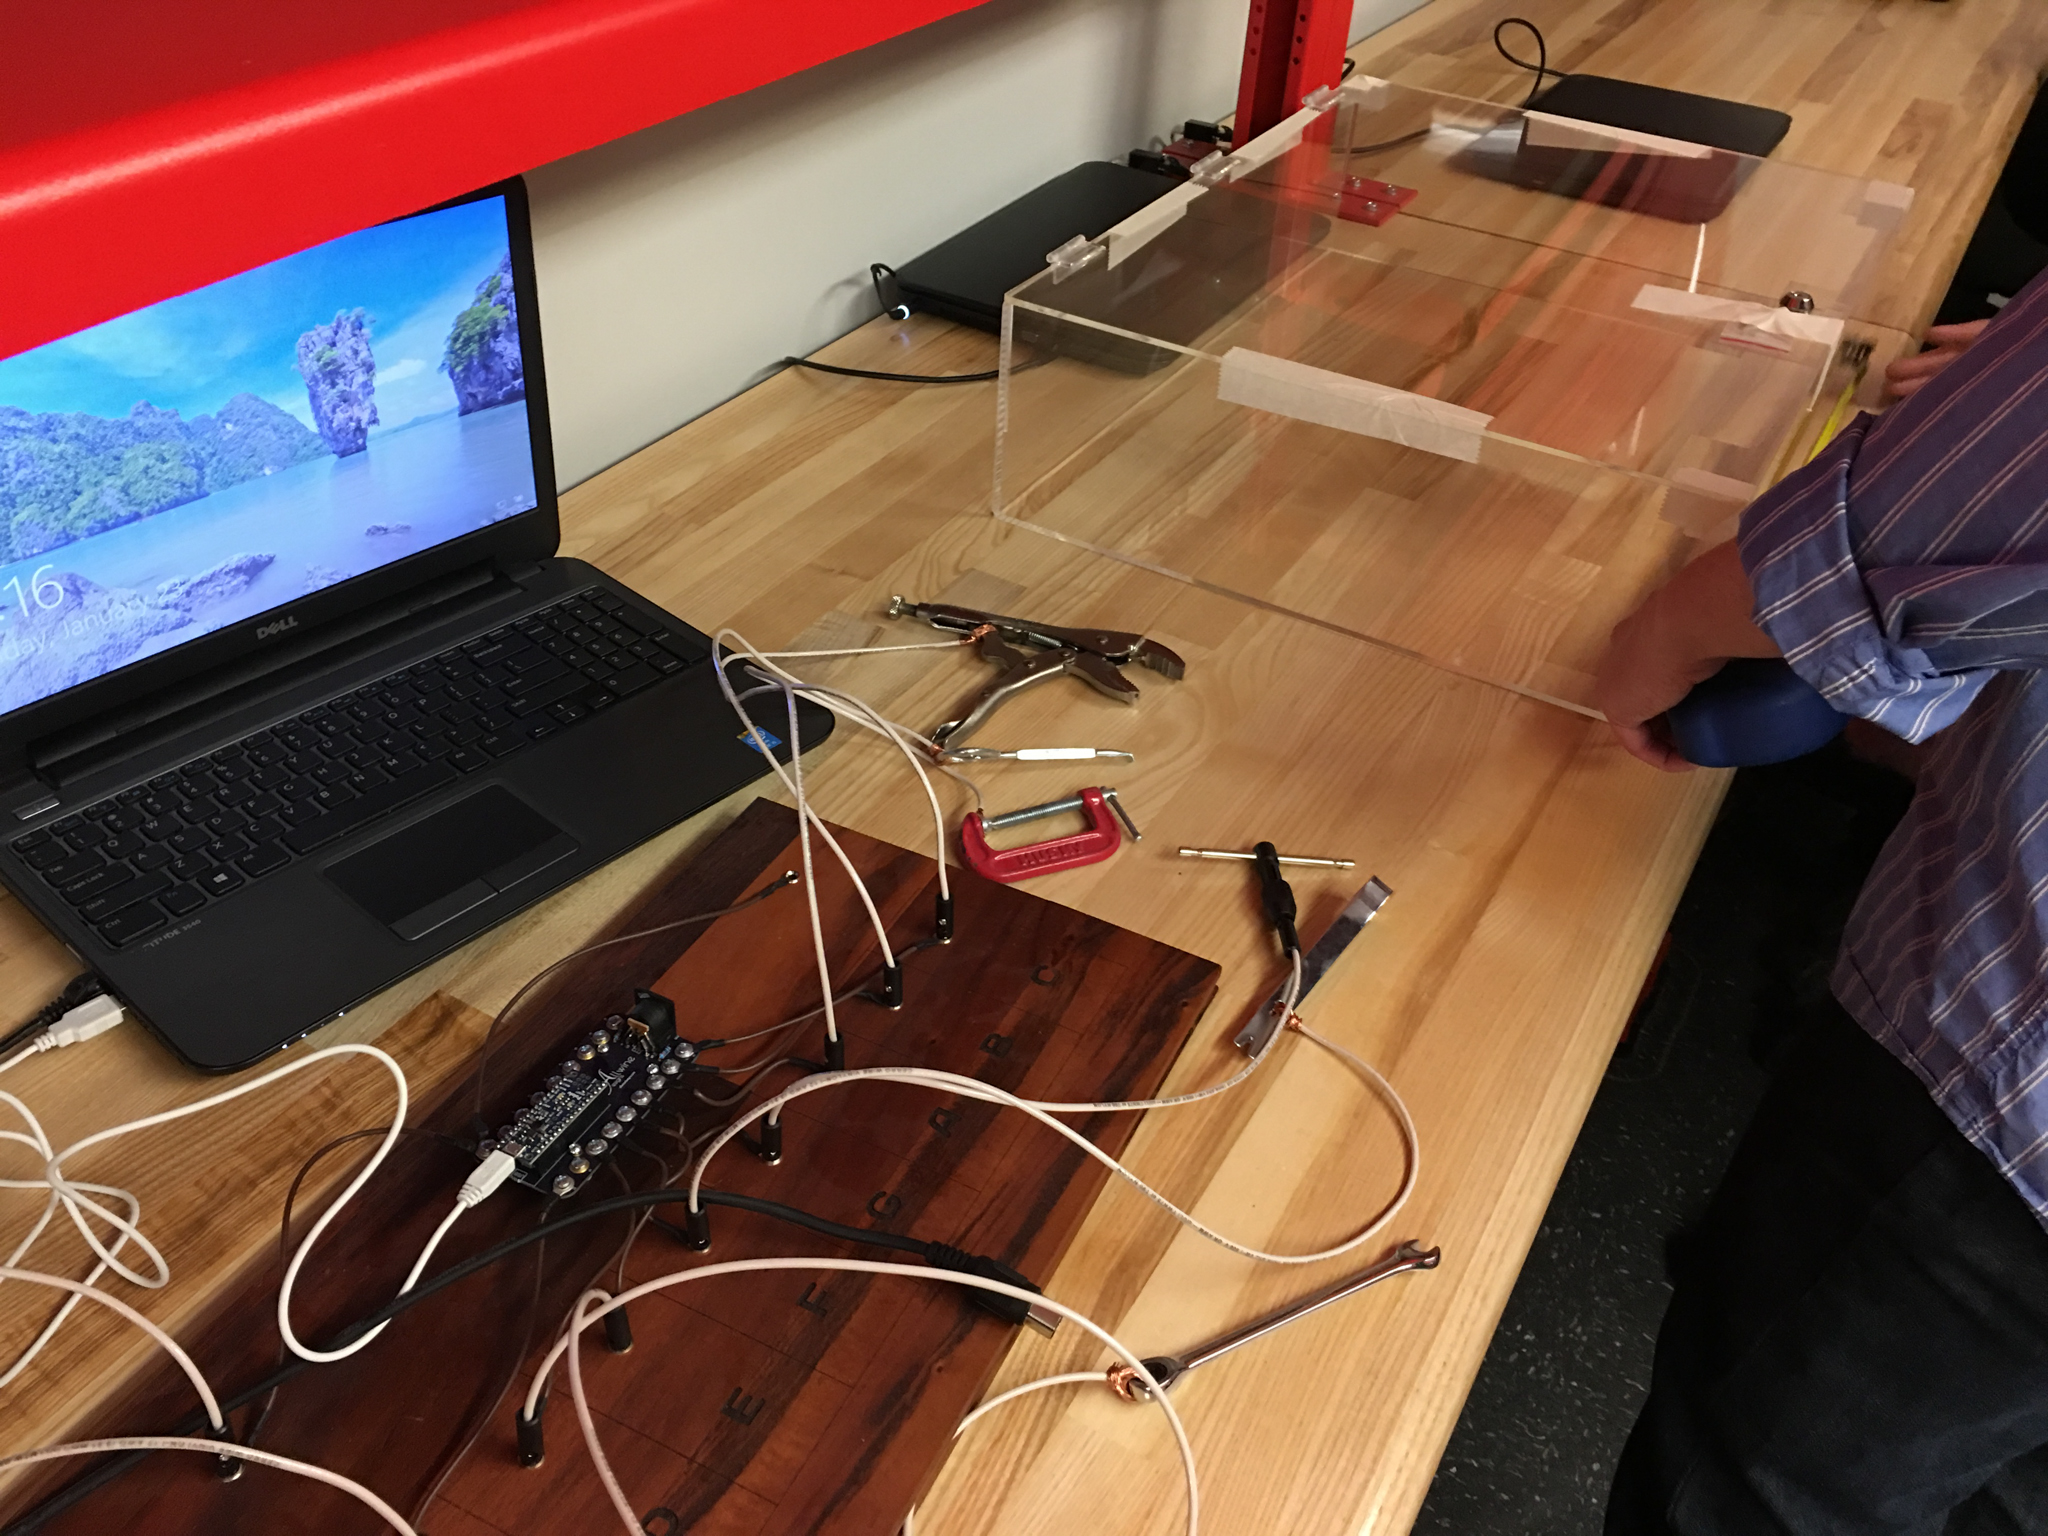
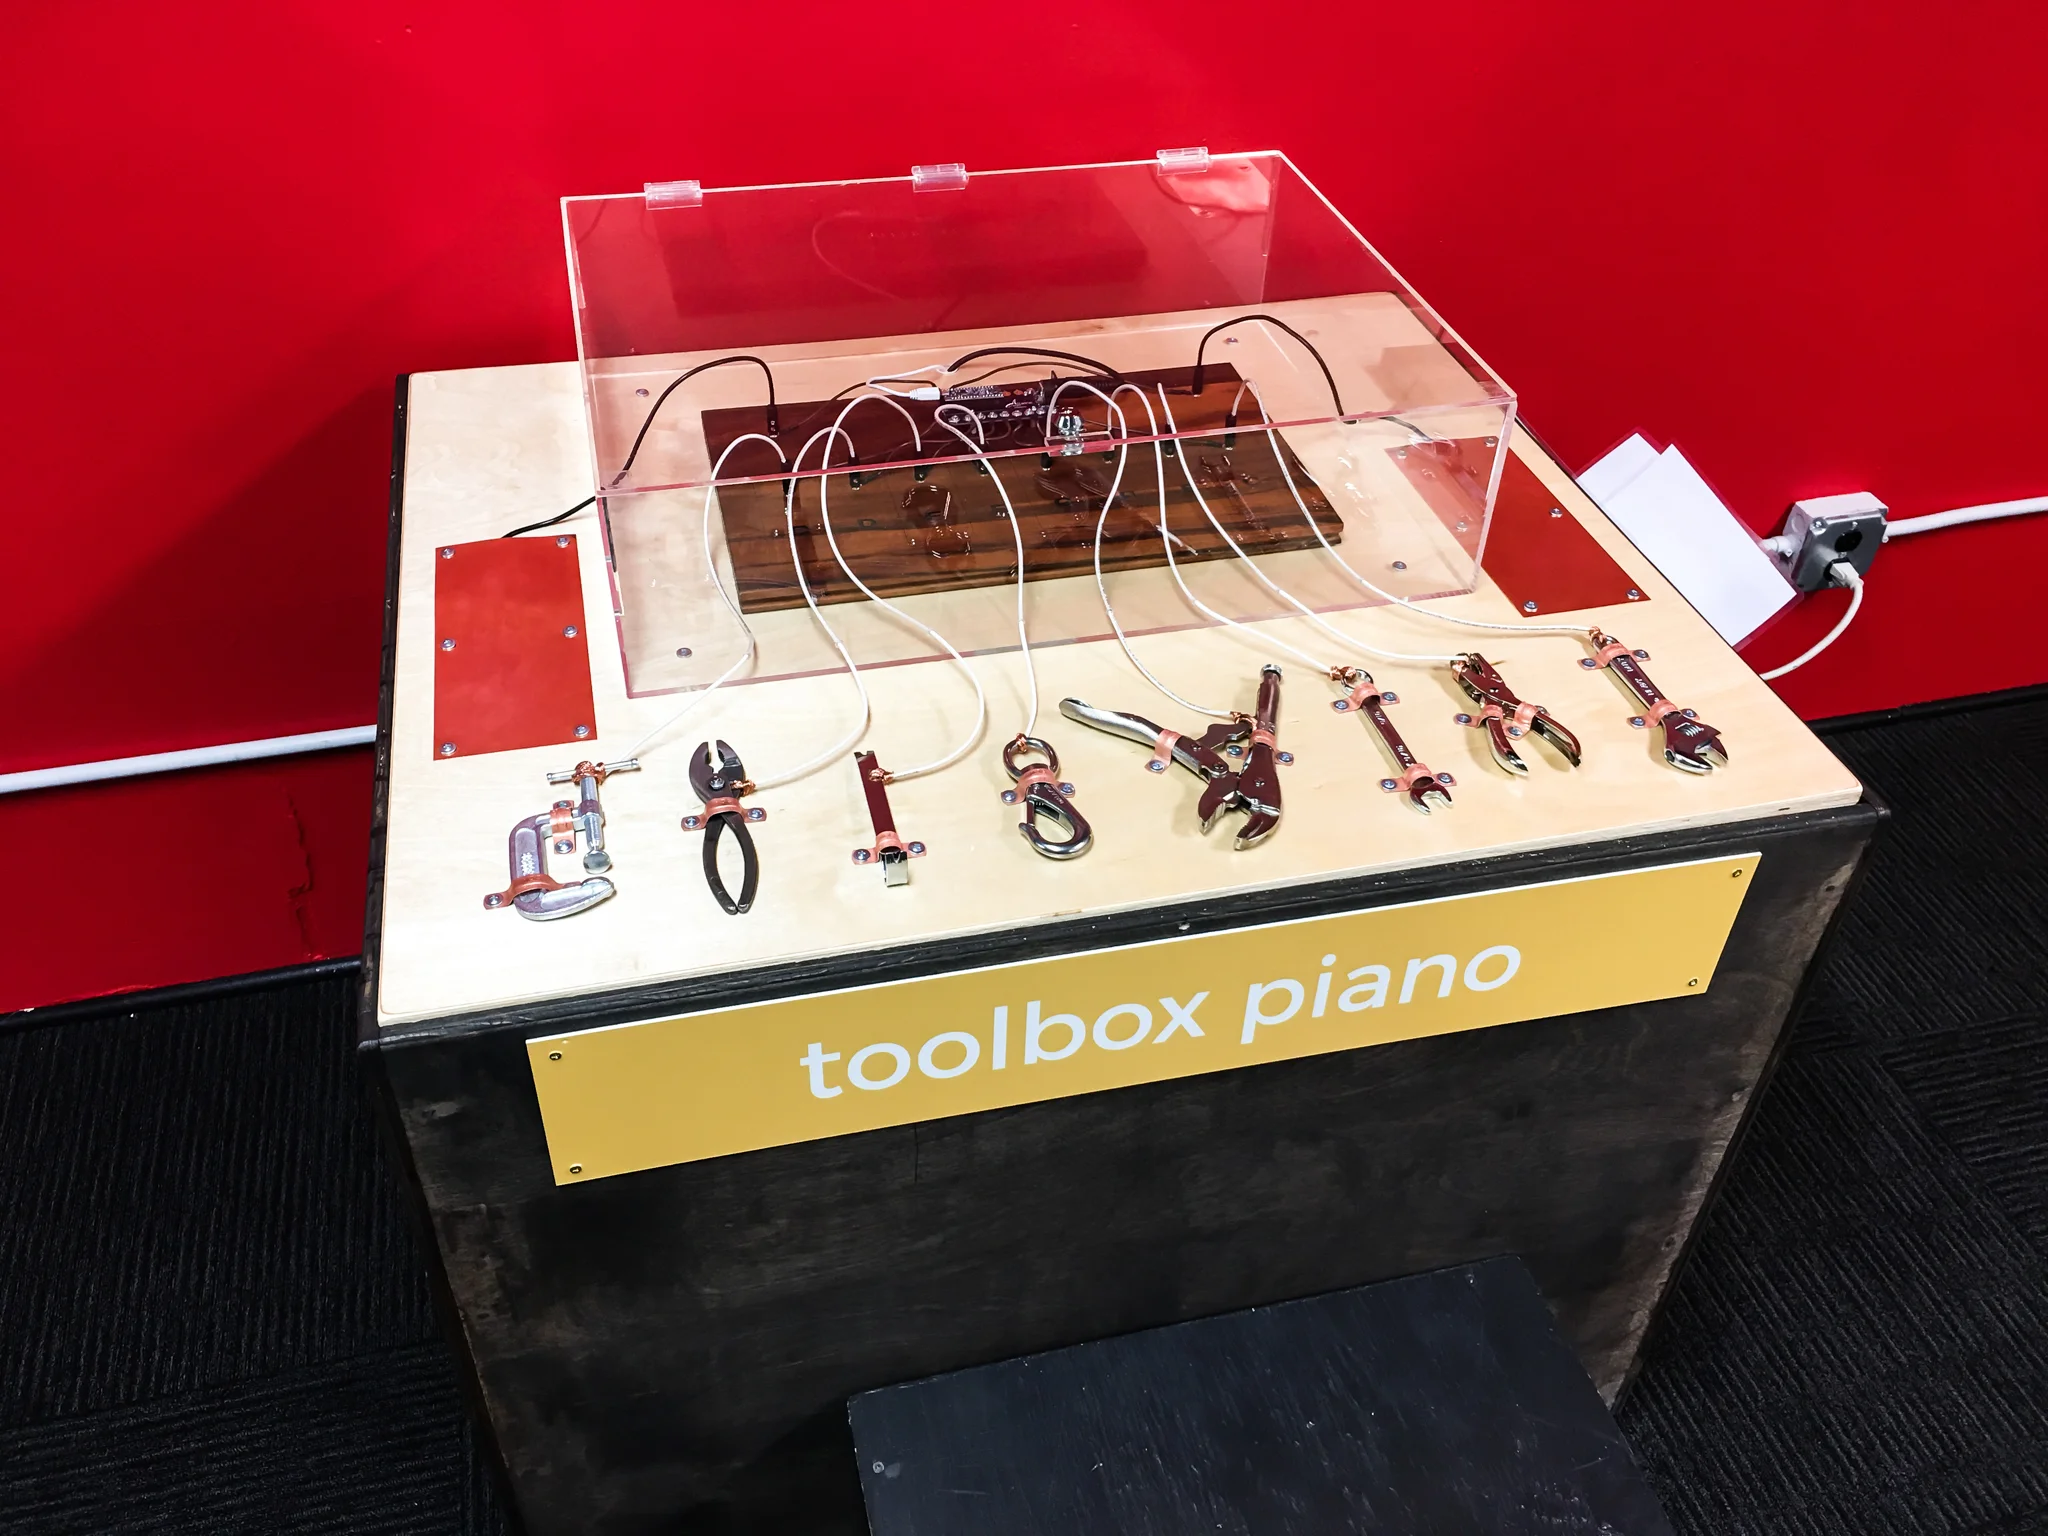
And here's the final exhibit, which can be played with on the bottom floor of the museum at 202 S Willson Ave in Bozeman. Just touch one of the copper plates on the left or right side of the table, then touch any of the tools with your other hand.
The Coding
Now let's go over the code that is running on the board. You'll need the Arduino IDE, along with a zip file of the MUSE library (the repository is on GitHub). You'll need to install the MUSE library by following the Arduino documentation.
I'll include the whole program at the bottom, but let's go over each part. First, we use a #define to tell MUSE that we want to output MIDI over the MIDI port rather than over the USB port. Then we include the MUSE library and create a MUSE object that we'll use throughout the program:
#define MUSE_USE_SERIAL1
#include <MUSE.h>

MUSE muse;
Next, comes the setup() function. In it, we initialize the MUSE object and register callbacks that will be executed when a change is detected on the pins we tell MUSE to monitor. Here you can see that I've bound the doC function to be called whenever a change is detected on pin 10. The current state of the pin will be passed to doC, so we'll know if it was pressed or released. We also bind the other notes to pins 2-8 (the only reason I skipped pin 9 was I accidentally cut my wire too short and it could only reach pin 10).
void setup() {
  muse.setup();

  muse.registerDigitalInputCallback(doC, 10);
  muse.registerDigitalInputCallback(doD, 8);
  muse.registerDigitalInputCallback(doE, 7);
  muse.registerDigitalInputCallback(doF, 6);
  muse.registerDigitalInputCallback(doG, 5);
  muse.registerDigitalInputCallback(doA, 4);
  muse.registerDigitalInputCallback(doB, 3);
  muse.registerDigitalInputCallback(doC2, 2);
}
Our loop function is next and is quite short. It just calls muse.loop(), which will check if the state of any of the pins that we told it to monitor have changed and call the corresponding registered function if a change happened.
void loop() {
  muse.loop();
}
Finally, we define each of our callback functions. They're all included in the full program below, but I'll show one of them here. All we do in the callback is check whether the pin was pressed or released. When pressed, we tell MUSE to turn the note on and if released we tell MUSE to turn the note off. You tell MUSE what note you want to turn on or off using the MUSE_<note> constants. The constants are set to the MIDI note numbers, so middle C or C4 is 60 and is bound to MUSE_C4. If you want to play the C above middle C using MUSE_C5. You can also use sharps by adding a capital S after the note's letter (if you want to use flats, you'll have to convert to the corresponding sharp). For example, if we wanted to play C#, a half step above middle C, we could use MUSE_CS4.
void doC(bool released) {
  if(released) {
    muse.noteOff(MUSE_C4);
  } else {
    muse.noteOn(MUSE_C4);
  }
}
Here's the program in its entirety, which you can copy into the Arduino IDE and upload to your microcontroller:
#define MUSE_USE_SERIAL1
#include <MUSE.h>

MUSE muse;

void setup() {
  muse.setup();

  muse.registerDigitalInputCallback(doC, 10);
  muse.registerDigitalInputCallback(doD, 8);
  muse.registerDigitalInputCallback(doE, 7);
  muse.registerDigitalInputCallback(doF, 6);
  muse.registerDigitalInputCallback(doG, 5);
  muse.registerDigitalInputCallback(doA, 4);
  muse.registerDigitalInputCallback(doB, 3);
  muse.registerDigitalInputCallback(doC2, 2);
}

void loop() {
  muse.loop();
}

void doC(bool released) {
  if(released) {
    muse.noteOff(MUSE_C4);
  } else {
    muse.noteOn(MUSE_C4);
  }
}

void doD(bool released) {
  if(released) {
    muse.noteOff(MUSE_D4);
  } else {
    muse.noteOn(MUSE_D4);
  }
}

void doE(bool released) {
  if(released) {
    muse.noteOff(MUSE_E4);
  } else {
    muse.noteOn(MUSE_E4);
  }
}

void doF(bool released) {
  if(released) {
    muse.noteOff(MUSE_F4);
  } else {
    muse.noteOn(MUSE_F4);
  }
}

void doG(bool released) {
  if(released) {
    muse.noteOff(MUSE_G4);
  } else {
    muse.noteOn(MUSE_G4);
  }
}

void doA(bool released) {
  if(released) {
    muse.noteOff(MUSE_A4);
  } else {
    muse.noteOn(MUSE_A4);
  }
}

void doB(bool released) {
  if(released) {
    muse.noteOff(MUSE_B4);
  } else {
    muse.noteOn(MUSE_B4);
  }
}

void doC2(bool released) {
  if(released) {
    muse.noteOff(MUSE_C5);
  } else {
    muse.noteOn(MUSE_C5);
  }
}